 JawAtlas
Anatomy
Studying impacted third molars on CBCT
After this page you will have a routine for looking at an impacted lower third molar on CBCT: how to describe its angulation, its relation to the inferior alveolar canal, its root form and the bone around it, and which plane answers each question.
Why third molars are a good CBCT exercise
An impacted lower third molar is often the first CBCT case a dental student meets, and it is an excellent one. The tooth sits at the back of a curved jaw, next to the ramus, the second molar and the inferior alveolar canal, and a two dimensional radiograph stacks all of these on top of each other. CBCT separates them, but only if you know which plane answers each question.
Everything below is about learning to see and describe. What should be done about any particular tooth is a decision for a qualified clinician, and nothing in JawAtlas is designed for that.
Angulation
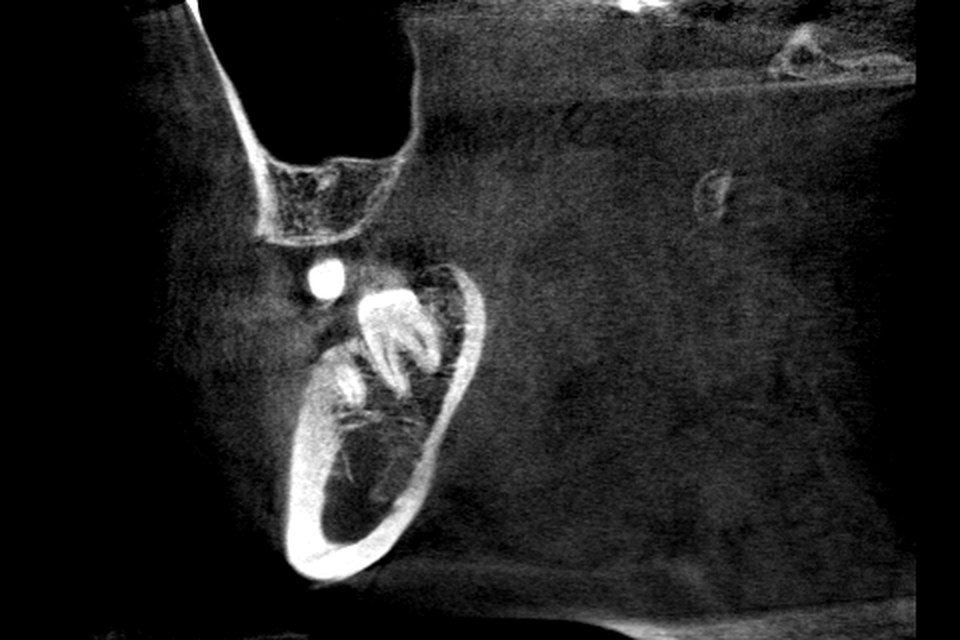
Angulation describes how the tooth is tilted relative to its neighbour. The reference is the long axis of the second molar. In a view along the arch, a third molar whose long axis is parallel to that is vertical; one tilted so the crown points forward toward the second molar is mesioangular; one tilted backward toward the ramus is distoangular; one lying flat is horizontal. Less common positions include inverted (crown pointing down) and transverse (lying across the arch, seen in the cross-section rather than along it).
The view along the arch is the panoramic reconstruction, or a sagittal slice if the arch is straight enough there. In JawAtlas, the Pano stage shows the tooth and its neighbour in one picture, and the Angle tool lets you tap out the two long axes and read the angle between them in degrees (see measuring length and angle). Measure on the slice that passes through the middle of both crowns, not one that clips an edge.
Relation to the inferior alveolar canal
The canal runs below and often slightly lingual to the molar roots, and a third molar root may end above it, beside it, or wrapped around it. Describing this relationship is the main thing CBCT adds over a panoramic radiograph. Start by finding the canal as a dark corticated circle on a cross-section behind the second molar, then step backward along the arch toward the third molar and watch where the roots and the canal sit relative to each other (see finding the mandibular canal).
Textbooks describe several appearances to look for when the root and the canal meet: whether the bright cortical rim of the canal is continuous or interrupted where the root crosses it, whether the canal keeps its width or narrows, whether it changes direction around the root, and whether the root outline is itself indented. Note what you see in each plane and where. Use the cross-section for buccal versus lingual, the sagittal or panoramic view for front to back, and the coronal plane to confirm.
Root form
Look at how many roots there are, whether they are separate or fused, how long they are, and which way the apices curve. A sharply bent root (textbooks say dilacerated) can point buccally, lingually or distally, and the bend only shows in the plane that contains it. Scroll through the entire tooth in the sagittal stack, then put the crosshair on each apex and read it in the cross-section. Do not trust a single slice: a root that looks short in one plane may simply be curving out of it.
Bone coverage and depth
Note how much of the crown is covered by bone, how deep the tooth sits relative to the occlusal plane of the second molar, and how much of it lies inside the anterior border of the ramus. Classroom schemes such as Pell and Gregory grade depth and ramus relation, and Winter's classification covers angulation; whatever scheme your course uses, CBCT lets you check each criterion in the plane that shows it.
The axial plane is the one students most often forget here. It shows where the crown sits in the arch, whether the tooth is displaced buccally or lingually, and how thick the buccal and lingual cortical plates are beside it. The coronal plane shows the same plates from the front, with the canal below.
A plane by plane routine
- Pano first. Trace the arch if needed, then look at the whole tooth and its neighbour in the panoramic view. Describe the angulation and take the angle (see tracing the dental arch).
- Cross-sections next. Drag the scout line from the second molar backward through the third molar. At each step note the root outline, the canal and the cortical plates.
- Axial. Switch to MPR, scroll to the level of the crown, then the cervical third, then the apices. Note buccal or lingual displacement and the cortical plates.
- Sagittal and coronal. Put the crosshair on each apex and on the canal, and confirm what the cross-sections suggested.
- Save moments. Save a moment at each key slice with a short caption, so you can replay the case or share it with a classmate (see saving and replaying moments).
How the panoramic reconstruction compares
A panoramic reconstruction from CBCT looks like a panoramic radiograph and is built the way a student pictures one: a curved slab following the arch, averaged into a flat image. That makes it the natural view for angulation and for a first impression of depth. It is also where the familiar overlap problem lives. The slab is several millimetres thick, so a root and the canal can lie in the same column of the image with bone between them and still appear to touch.
The cross-sections and the MPR planes resolve that overlap. The panoramic view is still the only one that shows the whole tooth, the second molar and the ramus in a single picture, so use it to orient yourself and the slices to answer specific questions (see CBCT versus a panoramic radiograph and how the reconstruction is made).
Practising on the demo scan
The bundled demo scan is a full arch mandible with a traceable inferior alveolar canal, so the whole routine can be rehearsed on its molar region. Once it feels automatic, import an openly licensed CBCT dataset for more cases (see free CBCT datasets).
Questions students ask
How do you describe the angulation of an impacted third molar?
By the angle between the long axis of the third molar and the long axis of the second molar, in a view along the arch. Textbooks group the result as vertical, mesioangular, distoangular, horizontal, or less commonly inverted or transverse.
Which plane is best for seeing the relationship between a third molar and the inferior alveolar canal?
A cross-section perpendicular to the arch, because it shows the root and the canal side by side in the buccolingual direction, which neither a panoramic view nor a plain radiograph can show. Confirm with the crosshair in the coronal and sagittal planes.
Why does a panoramic reconstruction not tell the whole story?
It flattens a thick curved slab of the jaw into one picture, so a root and the canal can overlap in the image even when there is bone between them. The cross-sections and the MPR planes give the third dimension back.
Does the JawAtlas demo scan have an impacted third molar?
The demo scan is a full arch mandible with a traceable inferior alveolar canal, so you can practise every step of the routine on this page in the molar region, whether or not a particular tooth is impacted. Any openly licensed CBCT dataset can be imported for more cases.
JawAtlas is an education and training aid. It is not a medical device and must not be used for diagnosis, treatment planning or any clinical decision.
Last reviewed 2026-10-13