 JawAtlas
Feature
Tri-planar MPR, the way a workstation does it
Axial, coronal and sagittal slices of the same volume, linked by one crosshair, labelled with the conventions you will meet on every clinical workstation.
One point, three views
Multiplanar reconstruction (MPR) slices the voxel block along three planes at right angles. In JawAtlas the three panes share a single point marked by a white crosshair. Drag it in the axial pane and the coronal and sagittal panes jump to the slices that pass through that point. Scout lines drawn in each pane show where the other two planes cut: red for axial, green for coronal and yellow for sagittal.
This is the habit the stage is designed to build: find a structure in one plane, then confirm it in the other two before you trust it. The guide to tri-planar MPR walks through why that matters.
Orientation you can trust
Each pane carries edge labels: R and L for the patient's right and left, A and P for anterior and posterior, H and F for head and feet. They are not fixed decorations. JawAtlas derives them from the orientation cosines stored in the DICOM series, so they stay correct when the volume was acquired with an unusual orientation or when you cut it at an oblique angle. Axial slices are viewed from the feet and coronal slices from the front, which puts the patient's left on the right of your screen, exactly as in the radiological convention.
Readouts and rulers
The top left of every pane shows the slice position in millimetres from the volume centre, for example "Axial +10.2 mm". A scale ruler (20 mm at a typical zoom) sits at the bottom left and a vertical slider on the right scrolls through the stack. Below the pane the window readout shows the current centre and width as grey values, such as "C 300 / W 1500 grey", with Bone and Soft Tissue presets one tap away.
Four named modes
- Move places the crosshair with a tap or a drag.
- Adjust changes the window: drag up and down for level, left and right for width. How to adjust window and level.
- Measure reads a length in millimetres between two taps.
- Angle reads an angle in degrees between three taps.
A "?" button opens the "How this view works" card, which explains the crosshair, the plane colours and the tools in plain language. New students see it on first open; everyone can bring it back.
On iPad
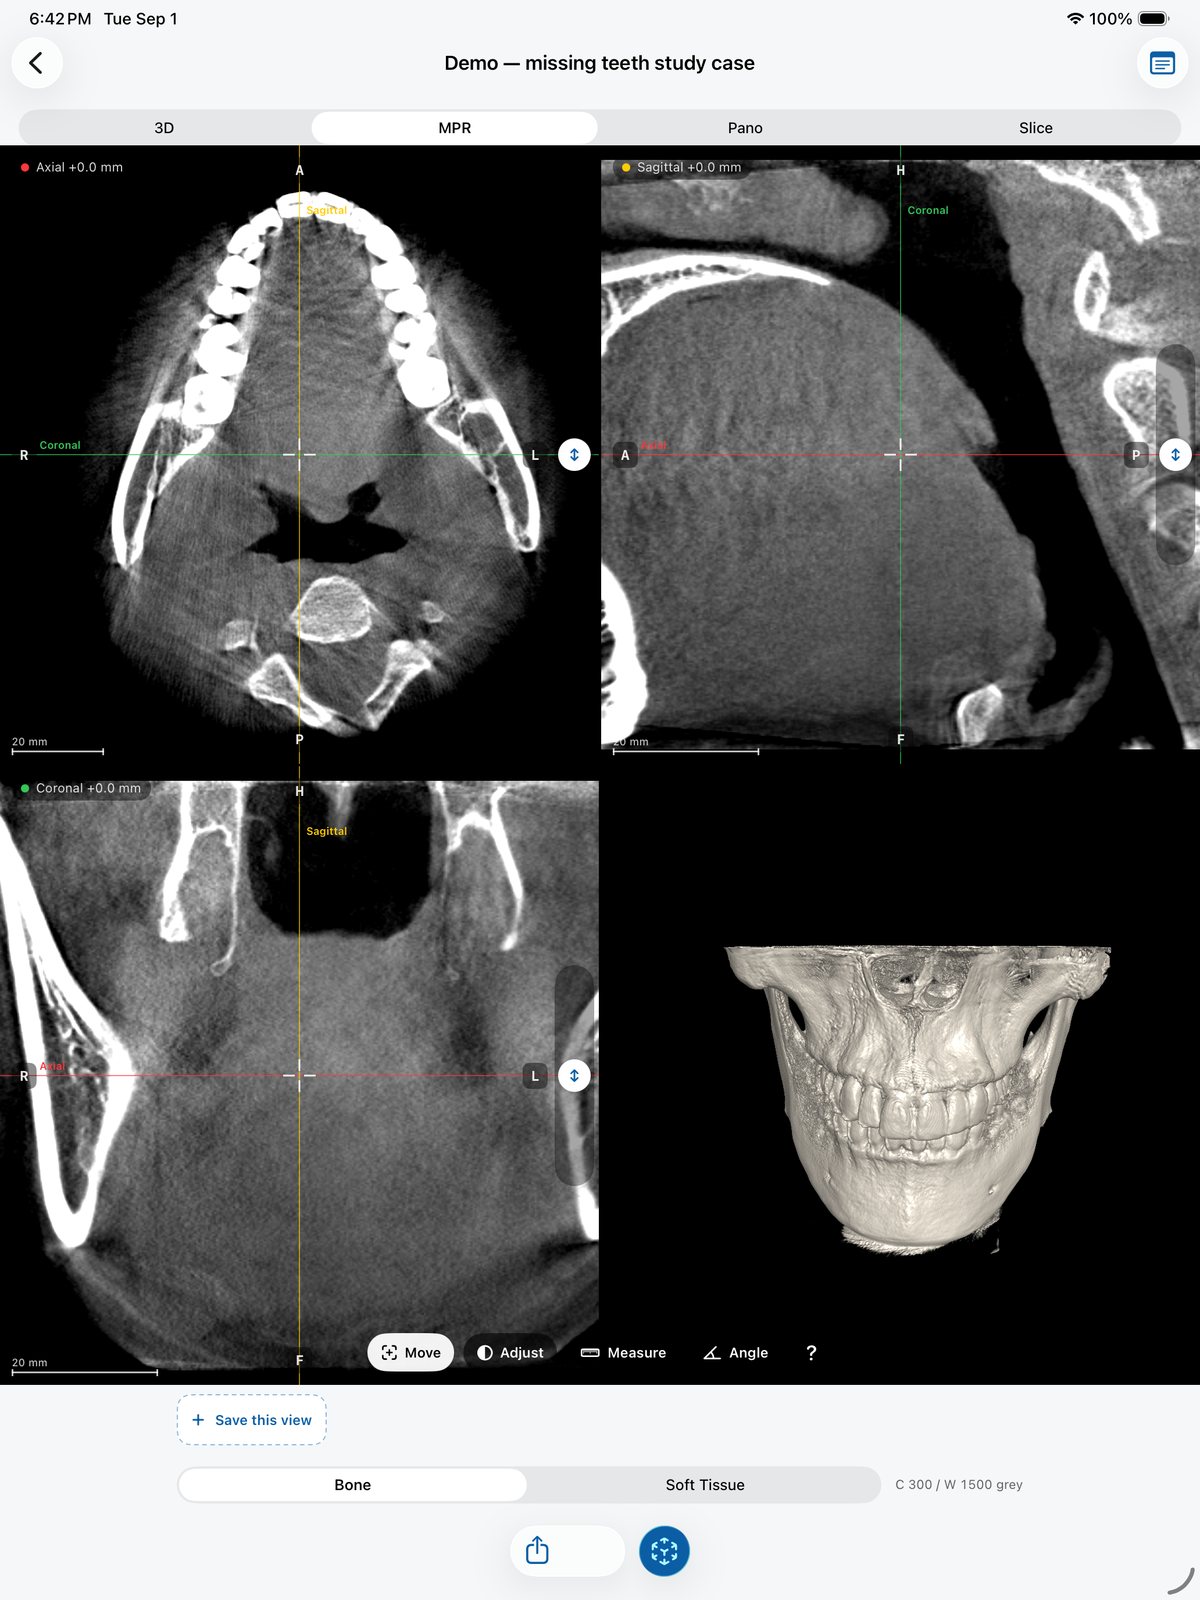
On iPad the MPR stage becomes the classic 2 by 2 grid: axial, sagittal and coronal panes plus a live 3D view, all sharing the same crosshair. More on using JawAtlas on iPad.
What it deliberately leaves out
There are no ROI statistics and no density readouts, because CBCT grey values are not calibrated Hounsfield units and a learner should not form the habit of reading pseudo-density off them. Why grey values are not HU explains the physics in plain terms.
Questions students ask
Why is the patient's left on the right side of the screen?
Because axial and coronal images follow the radiological convention: the axial slice is viewed as if from the patient's feet and the coronal slice as if you faced the patient. Clinics, PACS workstations and licensing exams all use this view, so JawAtlas does too.
Does JawAtlas show all three planes at once on iPhone?
On iPhone you see one pane at a time and switch with the Axial, Coronal and Sagittal buttons; the crosshair position is shared, so switching keeps the same point in the jaw. On iPad the three planes and a live 3D view sit in a 2 by 2 grid.
What are the coloured lines on the slice?
They are scout lines. The red line shows where the axial slice cuts, green the coronal slice and yellow the sagittal slice. They move with the crosshair.
Can I read Hounsfield units from a slice?
No. CBCT grey values are not calibrated like CT numbers, so the app shows window centre and width as grey values and offers no density readout.
JawAtlas is an education and training aid. It is not a medical device and must not be used for diagnosis, treatment planning or any clinical decision.
Last reviewed 2026-10-13